GulpにWebpackとビルドツールの使い方をなんとなく理解できてきたので、Angular2のQuick Startをやってみました。

1. Download the code
QuickStart用にサンプルコードが用意されています。これをダウンロードして進めていけばいいみたいです。
GitHubに公開されているのでgit cloneコマンドで取得できます。
$ git clone  https://github.com/angular/quickstart  my-proj
$ cd my-proj
ダウンロード後は次のコマンドで.gitファイルを削除します。
$ rm -rf .git
git initで自分用にgitリポジトリを用意します。
$ git init
$ git add .
$ git commit -m "Initial commit"
||>


GitHubやBitbucketを利用する場合は次のコマンドでデプロイできます。
>||
git remote add origin <repo-address>
git push -u origin master
おまけ
git commitするとき次の書き方をすればタイトルと説明を入力できます。
$ git commit -m "最初のコミット" -m "Angular2のQuick Startのサンプルコードです。"

node moduleの準備とアプリの起動。
$ npm install
$ npm start
これでlocalhost:3000でアプリを立ち上げることができます。
利用できるnpm scriptsについて
次のコマンドが利用できるみたいです。
$ npm start
$ npm run tsc
$ npm run tsc:w
$ npm run lite
$ npm run typings
$ npm run postinstall
$ npm test
$ npm run webdriver:update
$ npm run e2e
設定ファイルについて
tsconfig.json
TypeScriptのコンパイル情報を定義。
{
  "compilerOptions": {
    "target": "es5",
    "module": "system",
    "moduleResolution": "node",
    "sourceMap": true,
    "emitDecoratorMetadata": true,
    "experimentalDecorators": true,
    "removeComments": false,
    "noImplicitAny": false
  },
  "exclude": [
    "node_modules",
    "typings/main",
    "typings/main.d.ts"
  ]
}
typings.json
TypeScriptで必要な設定情報を定義。
{
  "ambientDependencies": {
    "es6-shim": "registry:dt/es6-shim#0.31.2+20160317120654",
    "jasmine": "registry:dt/jasmine#2.2.0+20160412134438"
  }
}
package.json
Node.jsで必要なパッケージとスクリプトを定義。
{
  "name": "angular2-quickstart",
  "version": "1.0.0",
  "scripts": {
    "start": "tsc && concurrently \"npm run tsc:w\" \"npm run lite\" ",
    "lite": "lite-server",
    "postinstall": "typings install",
    "tsc": "tsc",
    "tsc:w": "tsc -w",
    "typings": "typings"
  },
  "license": "ISC",
  "dependencies": {
    "angular2": "2.0.0-beta.17",
    "systemjs": "0.19.26",
    "es6-shim": "^0.35.0",
    "reflect-metadata": "0.1.2",
    "rxjs": "5.0.0-beta.6",
    "zone.js": "0.6.12"
  },
  "devDependencies": {
    "concurrently": "^2.0.0",
    "lite-server": "^2.2.0",
    "typescript": "^1.8.10",
    "typings":"^0.8.1"
  }
}
コンポーネントの作成
app/app.component.ts
import {Component} from 'angular2/core';

@Component({
    selector: 'my-app',
    template: '<h1>My First Angular 2 App</h1>'
})
export class AppComponent { }
Angular2を利用する際に必要なファイルはnpm installで取得できますが、利用するときはimport処理を実行すればいいみたいです。
import {Component} from 'angular2/core';@Componentではコンポーネント情報を指定します。ここでHTMLなどのテンプレートを記載できるみたいです。
@Component({
    selector: 'my-app',
    template: '<h1>My First Angular 2 App</h1>'
})
export classでそのコンポーネントが利用できるアプリケーションロジックを記載できるんだと思います。(Quick Startでは空のまま。)
export class AppComponent { }index.htmlの用意
コンポーネントの準備ができたのでそれを呼び出すHTMLファイルを用意します。
<html>
  <head>
    <title>Angular 2 QuickStart</title>
    <meta name="viewport" content="width=device-width, initial-scale=1">
    <link rel="stylesheet" href="styles.css">
    <!-- 1. Load libraries -->
    <!-- IE required polyfills, in this exact order -->
    <script src="node_modules/es6-shim/es6-shim.min.js"></script>
    <script src="node_modules/angular2/es6/dev/src/testing/shims_for_IE.js"></script>

    <script src="node_modules/angular2/bundles/angular2-polyfills.js"></script>
    <script src="node_modules/systemjs/dist/system.src.js"></script>
    <script src="node_modules/rxjs/bundles/Rx.js"></script>
    <script src="node_modules/angular2/bundles/angular2.dev.js"></script>
    <!-- 2. Configure SystemJS -->
    <script>
      System.config({
        packages: {
          app: {
            format: 'register',
            defaultExtension: 'js'
          }
        }
      });
      System.import('app/main')
            .then(null, console.error.bind(console));
    </script>
  </head>
  <!-- 3. Display the application -->
  <body>
    <my-app>Loading...</my-app>
  </body>
</html>
Angular2では基本、次のファイルの読み込みが必要になるみたいです。
<!-- IE required polyfills, in this exact order -->
<script src="node_modules/es6-shim/es6-shim.min.js"></script>
<script src="node_modules/systemjs/dist/system-polyfills.js"></script>
<script src="node_modules/angular2/es6/dev/src/testing/shims_for_IE.js"></script>

<script src="node_modules/angular2/bundles/angular2-polyfills.js"></script>
<script src="node_modules/systemjs/dist/system.src.js"></script>
<script src="node_modules/rxjs/bundles/Rx.js"></script>
<script src="node_modules/angular2/bundles/angular2.dev.js"></script>
次のコードはSystemJsの定義です。アプリケーションとライブラリモジュールの読み込みを行います。Webpackをつかって対応する方法もあるみたいです。
<script>
  System.config({
    packages: {
      app: {
        format: 'register',
        defaultExtension: 'js'
      }
    }
  });
  System.import('app/main')
        .then(null, console.error.bind(console));
</script>
Testing
Angualr2はTypeScriptをつかって開発できます。TypeScriptのテストは.specファイルで行います。例えば次のファイルです。
app/app.component.spec.ts

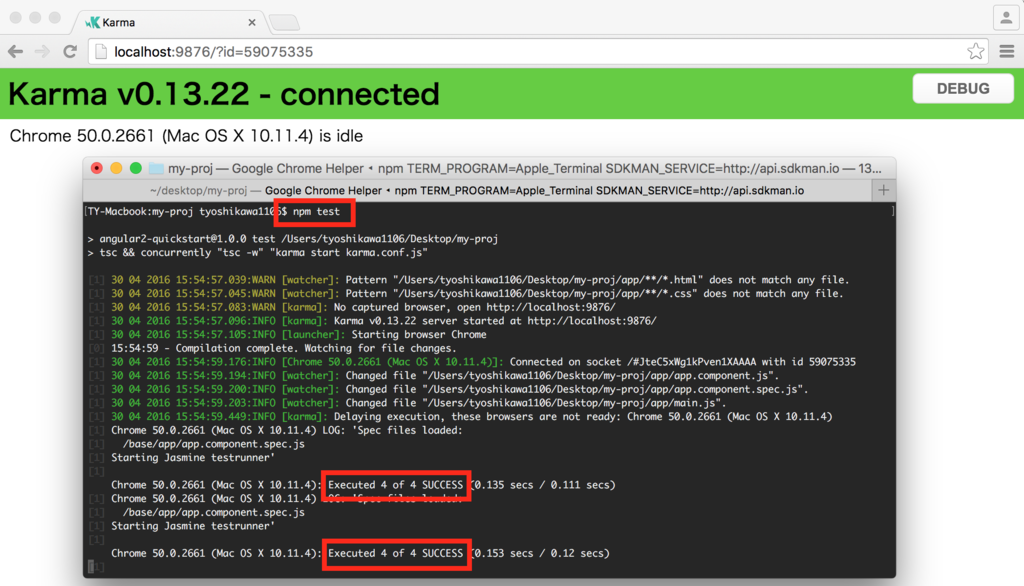
テスト実行は次のコマンドです。
$ npm test
テストはKarmaをつかって行っています。
以上のようなことをQuick Startを進めることで確認することができました。Quick Startでは環境構築的なこと確認できました。これの続きについては別メニューとして用意されたTutorialで確認できるみたいです。